Some things, though minor can be very annoying, and of them is having your phone give you the “Phone memory full” error message whenever you try to install an app, take a picture, download a video or a game, just to name but a few. This is quite annoying, and once this happens especially if the user needed to install or download something important, he or she may contemplate even smashing the phone on the wall or even buying a new phone. However, this annoying occurrence should not be reason enough to spoil your day or give you sleepless nights pondering on where to get the funds to buy a phone with a bigger memory. This is because restoring your phone memory is just a “finger tap” away from away. By following these simple steps, it is possible to free up space amounting to hundreds of megabytes on your phone and proceed with your undertakings without much fuss. Follow five simple steps listed below to free up space amounting to hundreds of megabytes from Samsung Galaxy, Moto, LG, Google Pixel/Nexus or other Android devices.
Note: Don’t forget to backup your Android phone data firstly in case of important files loss.
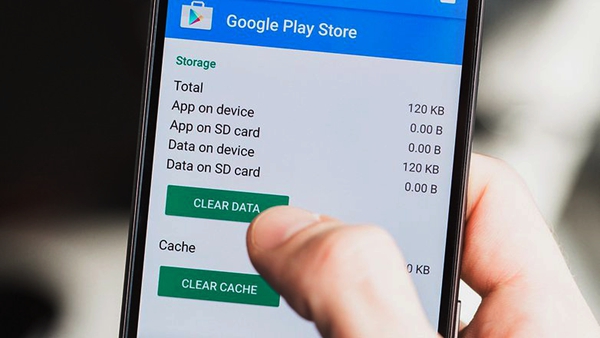
Clear the Cache
Delete Older Files
Move Photos and Videos to Google Photos
Move Data and Apps to SD Card
Uninstall Apps That You Never Use
Most Android applications use cached or stored data to ensure better user experience. The cached data may save some time, as well as data, but they are not necessarily vital because they are for convenience purposes only. The cached data is essentially made up of junk files, which can be deleted without any adverse effect on the on the system. Sometimes, the cached data may range anywhere from a couple of kilobytes to several megabytes, or even more.
The total cached data by the various Android applications may take even more than one gigabyte of the device storage space.
Cached data can be cleared by browsing the storage menu on the Android device.
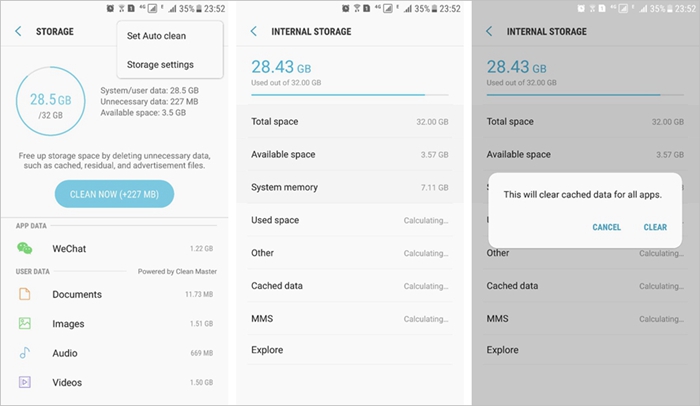
Method 1. Clear cache data for all app
Go to Settings and tap “General Management > Storage”, then tap menu icon on the top and select “storage settings”.
Tap the “cached data” option and choose OK when you get a prompt to clear the cached data.
Method 2. Clear cache for a single app
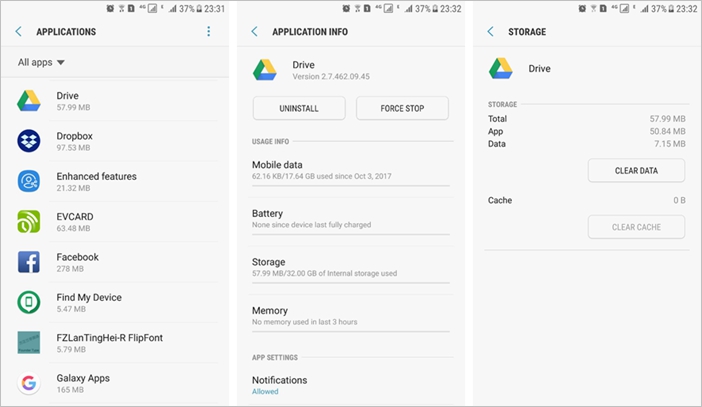
Conversely, one can also clear the cached data for each application manually by browsing on the settings, then applications, then select an application, and choose clear cache.
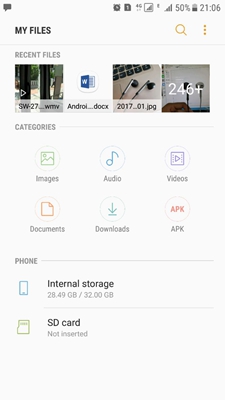
If the memory is still not enough to accommodate the files you need to download or pictures you need to take, you need to consider deleting obsolete files that may still exist on your device. These are old files that you no longer have a use for now or in the future. To do away with junk files that may be stored on your device, tap on the “My Files” app to be able to scrutinize and determine what is not necessary within the folder, which are sort by images, audio, videos, documents, downloads, APK.
The “Download” folder is a favorite storage point for junk files from the internet or those downloaded by other Android apps on your device. To sort the “downloads” list by size, tap on the top corner screen of your Android device. This allows you to determine what is taking up the largest storage space. In case you come across any file you do not need, hold on it to select, and once it is selected tap on the trash button to delete it.
Most people are ignorant of how cloud storage such as Google Photos or Dropbox works. This is one of the easiest and most efficient ways to back up data without ever worrying about losing it. Cloud storage is also essential for the storage of videos and pictures especially when the phone storage is running low. This can be done by moving all the pictures and videos on your Android device to cloud, and then deleting them from your Android device.
Moving pictures and videos to your Google Photos account involves three very simple steps and can be done by anyone as long as they follow these three steps.
Step 1: Associate your Google account on your Android device, and in case you do not have one just create it there and then.
Step 2: Install and open Google Photos app on your phone, it will log into your Google account automatically.
Step 3: Next tap the menu icon at the toper right, tap “settings > Backup & sync” and check if the “back up & sync” switch is on.
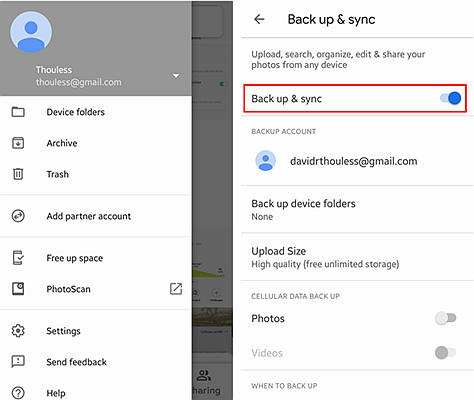
Step 4: Connect your device to WiFi and wait for the Google Photos back up all your photos on your device, it will take some time depends on how many photos you have.
Step 5: Now you can delete all the videos and photos from your Android device since you have them backed up in your cloud account.
On Google Photos, tap the menu icon and select “Free up space”. You will see a pop-up window shows how many photos could be removed to free up device storage.
Tap “Free up” to delete the photos from your device.
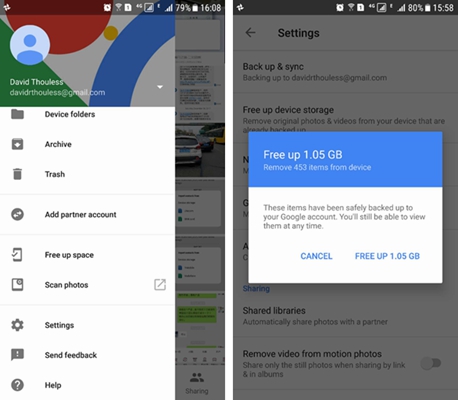
This ensures that more storage space is created in your Android system, and it is the best way to free up a large storage space at once.
The storage space on most Android phones cannot accommodate all the files and applications that one may need in their gadgets. This does not mean that one cannot have more files and applications than the handset can accommodate in its internal memory. All you need to do in such a scenario is to purchase a microSD card which is way less expensive than an Android handset. Once this is done, you can move the various applications and files in your Android device into the microSD by following the following simple steps.
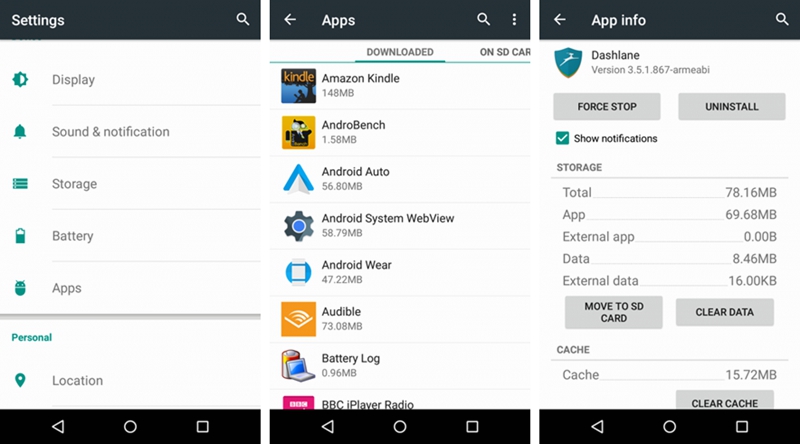
Step 1. Go to Settings > Apps, then choose the application that you need to move to the SD card.
Step 2. Tap on the “storage” then chose “Move to SD Card” if it appears, but if it does not appear, it means the application cannot be moved.
Step 3. Tap on the “Move to SD Card” option and the application will be successfully moved to SD card.
You can repeat this for all the other applications that you need to move, after which you can delete them from your operating system to free up space on your Android device.
Another way in which one could free up space on his/her Android device is by uninstalling applications that are not in use, or ones that are used least.
Step 1. Go to the Play Store app, then tap on the menu button showing a three-line menu on the left top.
Step 2.Once that is done tap on “my apps and games” and choose the “Installed tab”. Select the “sort” button, which can be found at the top of the right corner on the screen and choose the “last used” option. Scroll down to the bottom of the list where applications you rarely use can be found.
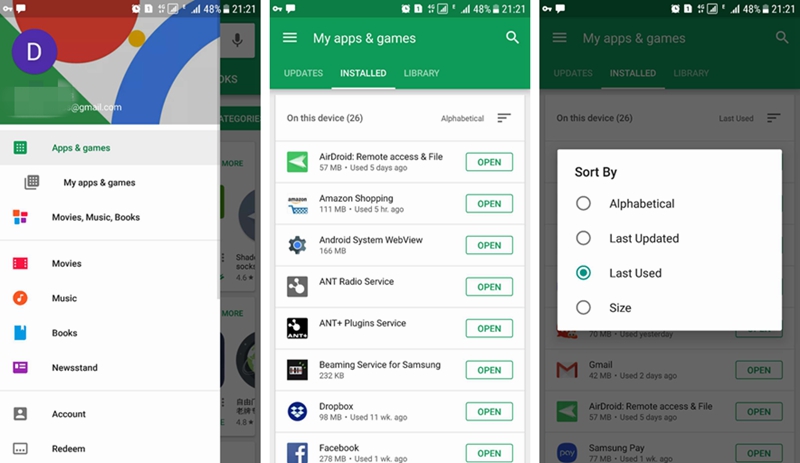
Step 3.Confirm the application that you do not need and tap it, then choose the “uninstall” option. Do the same for all other applications that you do not use to free up space on your Android device.
Consequently, once all the above steps have been undertaken, you will have freed up adequate storage space on your Android device whether Samsung Galaxy, Moto LG, Google Pixel, or Nexus. Following any or all these simple steps will ensure that you always have adequate memory on your Android device whenever you need. This further ensures that you avoid simple disappointments associated with your phone not having enough storage memory when you need it most.