How to share your Android phone’s mobile data connection with laptops, tablets and other devices. It is quite easy to establish a Wi-Fi hotspot if one is intending to share phone’s data connection with some other devices such as a tablet, PC or even Mac. Android possesses various Wi-Fi capabilities and the ways in which it works depends on your carrier or your phone model. That explains the reason as to why various Wi-Fi connections work differently. This article covers the various options that you can choose if you need to share you’re your data connections over Wi-Fi with other devices. One thing you need to be cautious about is that tethering drains your battery rapidly and consumes a lot of mobile data.
How to enable Wi-Fi Hotspot on a Samsung Galaxy
How to set up mobile Wi-Fi Hotspot on other Android Devices
Connect Internet from computer to the Android using Bluetooth Tethering
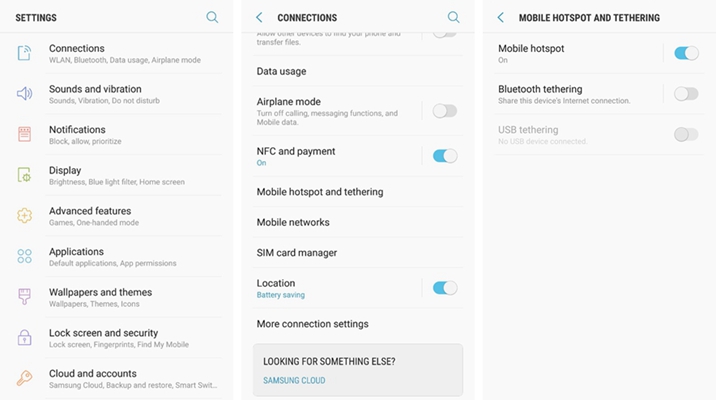
1. In your home screen or app drawer, select setting.
2. Tap Connections > Mobile hotspot and tethering.
3. Tap on the Mobile hotspot. Tap the toggle you find at the top of your screen.
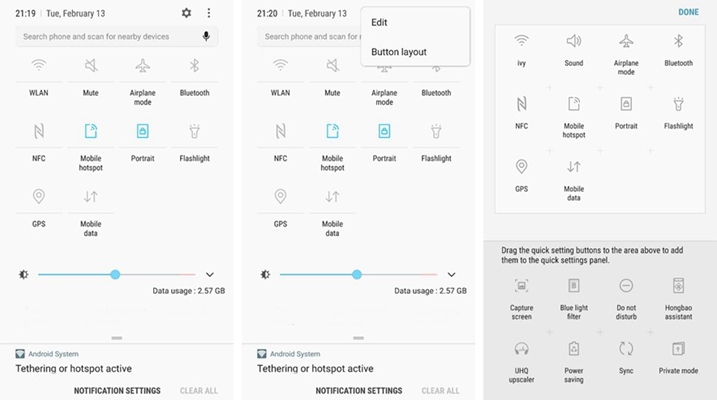
You can also easily do it through a shortcut found in the quick setting area of your phone.
1. In order to view the notifications and quick settings, swipe down from the top of your screen.
2. If you fail to see the mobile Hotspot option, see all quick settings by swiping down again.
3. To change the quick settings shortcut position, tap on the three vertical dots select EDIT, then drag the mobile Hotspot to a place of your choice.
Configure your Wi-Fi Hotspot on Samsung Galaxy
If you are using the Wi-Fi Hotspot for the first time on your Samsung Galaxy and you wish to come up with your own network name and password or change other settings in it, this is how you can easily do it.
1. Tap more at the mobile Hotspot menu at the top right corner of your screen.
2. Choose your Network name and password by tapping Configure Mobile Hotspot. To type complex passwords, you can easily do it by tapping show password.
3. Tap on the three vertical dots and choose Timeout settings in order to set the time that your phone will wait before turning off the Hotspot. The phone will turn off if there is nothing connected to it.
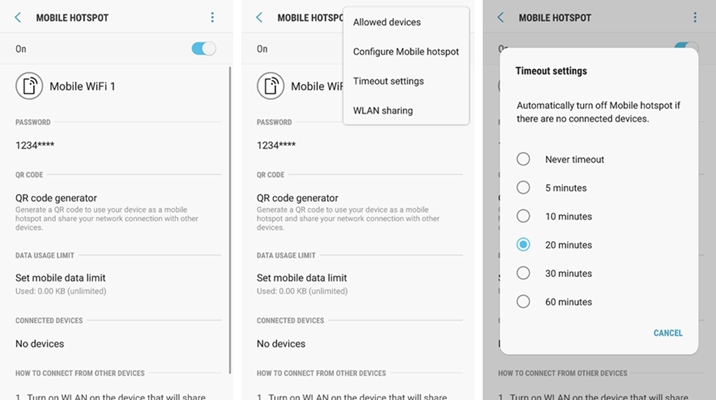
It is important to note that you can disable the network security from this menu but such idea is bad.
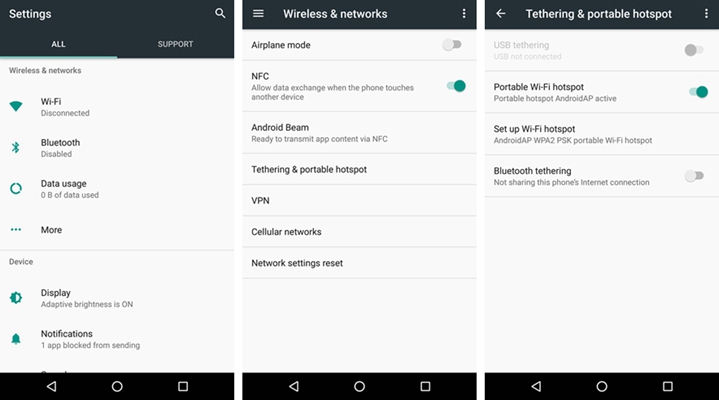
Procedure for Enabling Wi-Fi Hotspot
1. In your home screen or the app drawer of your phone, select settings.
2. Tap more under Wireless and networks.
3. Select Tethering and portable hotspot.
4. Tap the toggle just next to Portable Wi-Fi Hotspot.
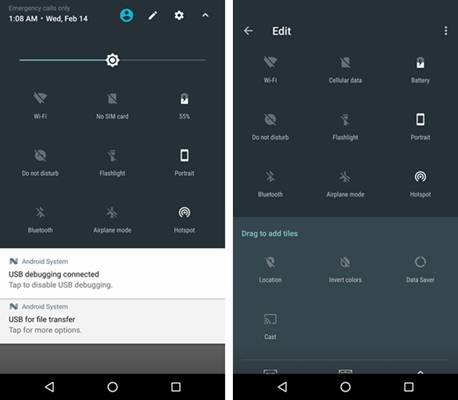
You can also easily do it through a shortcut that you can find in the quick setting area.
1. View the notifications by simply swiping down from the top of the screen of our phone.
2. View the all the quick settings by swiping down again.
3. If you fail to find the Hotspot shortcut, tap Edit. Long-press on Hotspot icon then drag it to the tiles grid.
Configuring your Wi-Fi hotspot
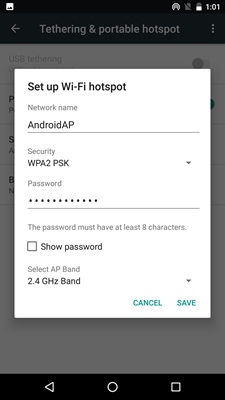
Many first time users for this Wi-Fi hotspot feature may want to set their own network name and secure it with a password or even change other Wi-Fi Hotspot settings. This is how to do it.
1. Tap the Set up Wi-Fi hotspot that you will find on the menu on tethering and portable hotspot.
2. Enter your network name and the password. By tapping Show password you can type the password easily and quickly without confusion.
3. You may select the AP Band but this can often be left at the default 2.4GHz. Although 5GHz works more effectively in crowded places where Wi-Fi traffic is more, it has a short range.
It is good to note that you may decide to disable the network security from this menu. However, such an idea is not recommended.
Tethering in Android can be done over Bluetooth or Wi-Fi hotspot. The reason to why you need to Tether over Bluetooth is that Wi-Fi hotspot will rapidly drain your battery compared to the Bluetooth. The following are the steps you need to follow in order to connect internet by Bluetooth tethering. However, you need to make sure that your laptop or computer has a Bluetooth device with a functional installed Bluetooth driver.
Step 1. Turn on the Bluetooth on your Android device and your laptop. On your Android device, go to Bluetooth settings and pair the Android device with your laptop.
Note that you need to make sure that your Bluetooth device is visible and if it is not, just go to Setting>wireless and setting>Bluetooth, select check box visible that corresponds to your mobile name to make it visible.
Step 2. On your Android device, enable your mobile data and test to confirm that the Internet is working properly. Open web pages in your browser to check.
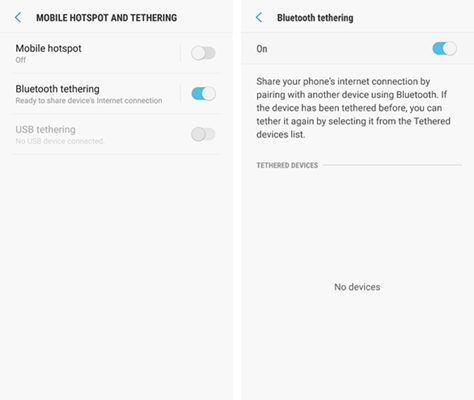
Step 3. Tap settings on your phone then select wireless and networks, then tap on Tethering and portable hotspot. Tap and select Bluetooth tethering.
Step 4. After you are done with your phone, move on to your laptop or computer in order to make some steps. Open the Control panel (press window key and then click windows system > control panel if you are using Windows PC) and then select “Hardware and Sound > View devices and printers” in order to add the Bluetooth device that you have already enabled on your Android device.
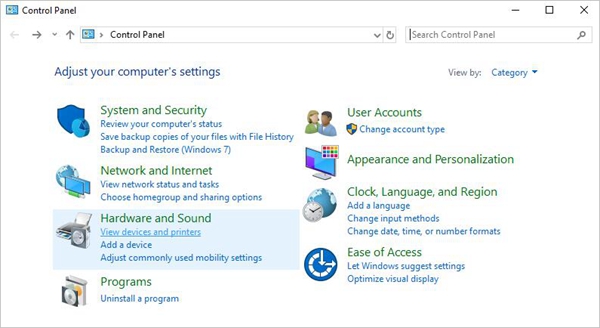
Press “Add a Devices” button that appears above the window bar in order to add your Android device, then you can now see the Android device with its Bluetooth on in the opened up window.
Step 5. Lastly, in the Devices and printer window, select the device and then right click on it. You will now see the Connect with internet access option.
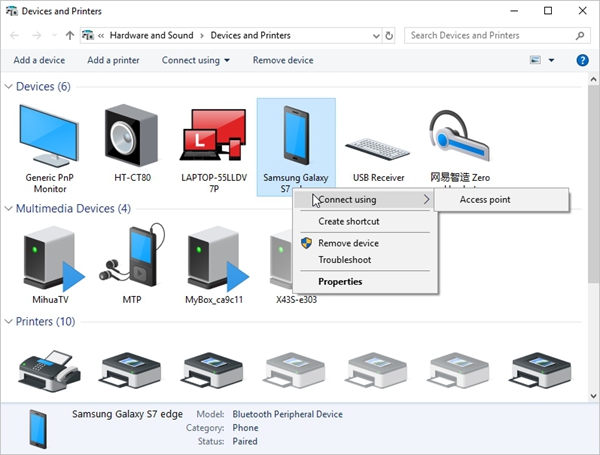
Step 6. You can now access the Internet within a few seconds in your laptop right from your Android mobile device, and you can see your laptop is in the tethered devices list on your phone’s Bluetooth tethering screen.
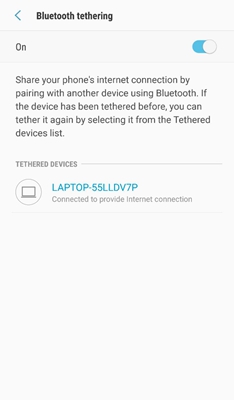 With your Android device connected, you can now open the browser and start browsing.