 More and more people are shifting to messaging as a form of communication especially for those communication types which are not urgent. In response to this trend, Apple has been on the forefront at improving the capabilities and functionalities of the iMessage feature.
The improved iMessage feature in iOS12 has made the exchange of messages to be more convenient, more efficient, and even more fun. It is now possible to get read receipts of specific contacts and continue with an iMessage chat from different iOS devices. The iMessage app has also made it easy for you to share your current location with your contacts, set unique message notification tone for a special contact, and easily block spam messages.
If you are yet to explore the full potential of the iMessage features, then this post is the best for you. Read to the end to get 5 best tips and tricks for iMessage on iPhone and be sure to try them on your iOS12 device.
How to enable read receipt for certain contacts
How to read and sent text messages on Mac/iPad
How to share your current location through iMessage
How to set a unique message ringtone for a special contact
How to block iMessage spam
Read receipts are crucial since they help you to track a conversation. This is beneficial especially when you are holding a chat with your favorite friend, a family member or a colleague. Before the release of iOS 10, the earlier iMessage apps did not support per-person read receipts. You had to either enable the message receipt functionality for all your contacts or disable read receipts on all contacts.
It is exciting to note that with iOS 12, it is possible to enable read receipts on per-person bases. Such a feature is a big welcome since it will help you to gain more control over your conversations. You should note that if you enable a read receipt for a given contact, that person will as well be able to get your read receipt status if they send a message to you. Therefore, use this feature wisely.
Follow the steps below to enable read receipt for certain contacts:
1. Launch the Message app on your device.
2. Open the conversation thread of the person whom you would like to enable the read receipt status. The normal conversation interface with options to type and sent messages to this contact will be displayed.
3. On this conversation interface, tap the drop-down arrow and check for ‘info’ a lettered (i) icon at the top-right of the displayed interface.
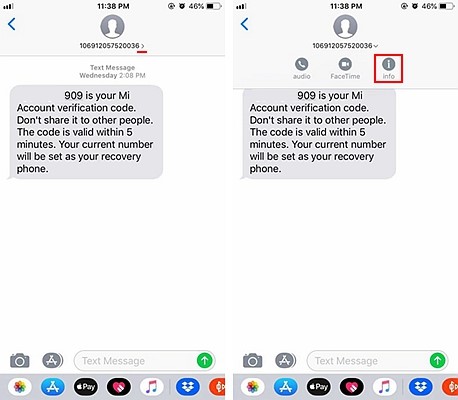
4. Several options will be displayed. Look for the “Send Read Receipts” and tap the button on the right to switch it on. An ON status will be indicated when the toggle on/off button turns green.
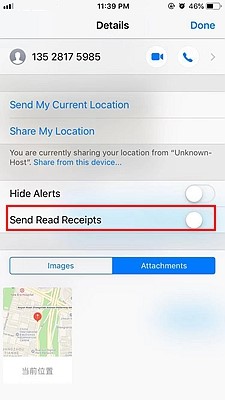
5. After turning the read receipts status “ON” check at the top of this interface for a “Done” Button and tap it to finish setting the read receipts status. With this set, you will be able to receive read receipt status of all messages exchanged between you and this contact. Remember that if the person on the other end turns the “read status off” on their devices, you will not be able to get their read receipt status. Thus this setting is two-way.
You can as well be in need of setting all your contacts read receipts on. This is quite possible on both iOS12 and even in earlier versions of iOS. But you need to note that setting specific contact read receipts is not possible with iOS versions which were released before iOS10.
To set ALL your Contacts read receipts on, follow the following steps:
1. Launch the Settings App and tap on the “Messages” settings.
2. On the interface displayed, look for “Send Read Receipts”. If the toggle button on the right of the read receipts option is not green, the send receipt status is off. To turn it on, just tap on this toggle button. The button will turn to green implying that you will receive read receipts for all messages you send to your contacts whose read receipts are also turned on.
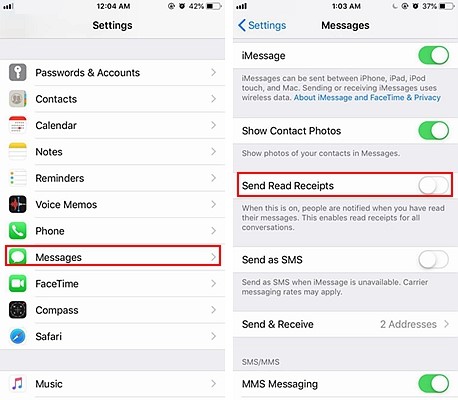
Remember that turning all contacts read receipts on will override any other read receipts settings you had set for specific contacts.
Sometimes you may be having several iOS devices with you. For instance, you could be chatting using your iPhone while at the same time preparing some work on your iPad. It will be time-wasting and distractive to stop using your iPad to pick your iPhone to reply to a message then revert to using the iPad.
To solve such challenges, Apple incorporated a continuity feature in iMessage. This continuity feature synchronizes all messages you receive with your devices to ensure that you can read and reply to these messages using the most convenient device at that given time.
To benefit from this continuity feature, you should first ensure that all your devices are signed in to the same iCloud account and connected to the internet. This enables the Apple iCloud servers to synchronize all your devices and enable the continuation of tasks from any device.
Below are the steps on how to read and send text messages on Mac/iPad
1. First, ensure that both your iPad and iPhone are connected to the internet and logged in to the same iCloud account.
2. Tap on the settings app on your iPhone.
Tap the messages settings and select the “Text Message Forwarding” option.
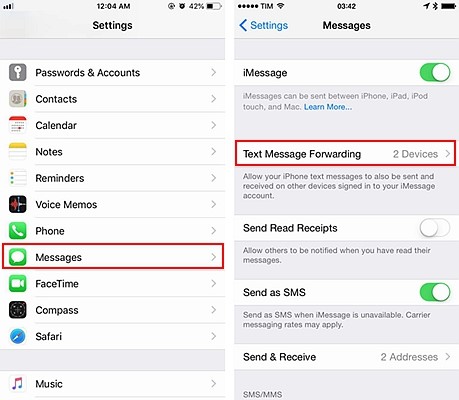
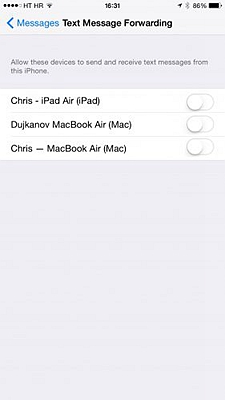
3. On the resulting interface, look for the option for forwarding messages to your iPad and turn it on.
A pop up will appear on your iPhone screen prompting you to enter a code which should have been sent to your iPad device.
5. Check for this authorization code from your iPad device. If you do not get this authorization code immediately, do not worry. Give your iPad an allowance of around 4 minutes. If you do not get this code within this period, turn the text message forwarding option OFF and turn it ON once more. You should be able to receive the text message unless the two devices are not signed-in to the same iCloud account.
6. Enter this code on the popup textbox on your iPhone and select “Allow”. You will have successfully enabled reading and replying to messages from your iPad/Mac device.
If you receive an iMessage on your iPhone, just launch the messaging app on your iPad/Mac device and check for this message. You will have a choice of using any of the devices to reply to these messages.
There are several ways of sharing your location including the use of Google map pins and even texting your exact location through a text message. However, these methods are not as much intuitive as the method offered by the iMessage location functionality.
There are two ways of sharing your current location on your iOS12 device using the iMessage functionality.
Method1: The quickest method of sharing your current location
1. Open the messaging app and tap on the conversation of the contact you want to share your location with.
2. Type: “I am at” then space the last word and wait for a few seconds. iMessage will fetch your current location and display it just above your virtual keyboard. Tap on this location and wait for some time. A link of your current location will be generated. Tap on the sent message to send this location pin to this contact.
3. You can as well set a location by just typing “Where are you?” and sending this message to the other person. Such a message will trigger the recipient’s iMessage to generate a pin with a link to their current location. The recipient will then just tap the send button to share their current location with you. With iMessage, it’s that easy! Now you know why location sharing using iMessage was included as one of the 5 best tips and tricks for iMessage on iPhone.
Method2: How to share your current location
1. Launch the message app on your iOS device and select the contact you would wish to share your current location with
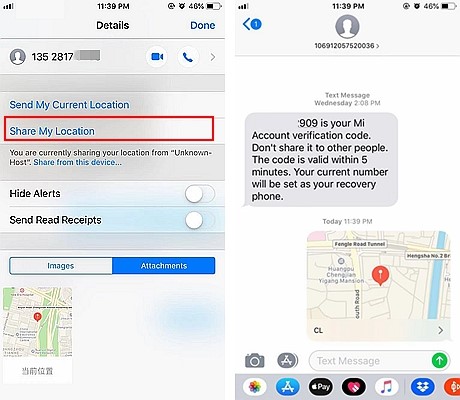
2. Tap the drop-down button at info option.
3. Select “Send My Current location” to generate a pin with a link to your current location. By doing this you will have successfully shared your current location with this given contact.
1. Tap on your Contacts app and type the name of your special contact.
2. Tap on the edit button at the top right side of the screen.
Scroll down and tap on the text tone setting. A list of tones will be displayed.
Choose your desired tone from this list.
3. To effect this new setting press the save button. Repeat this procedure to set various message tones for different contacts.
Spam messages are as much annoying as they are unsolicited and in most cases irrelevant. If these spam messages are sent to your phone frequently they become distractive and to some extent a nuisance.
Below are the steps on how you can block these Spam messages on iMessage:
1. If the person has recently called you, go to your Phone app, select “Recent” to get access to numbers which have recently called you. Tap the “i” button on the right side of the contact you want to block. Scroll to the bottom of this interface and select the “Block this Caller” option.
2. If you are on the FaceTime app, the procedure is almost similar to that of the Phone app. Launch the app, select the “i” button next to the spammer number then scroll to the bottom and select “Block this Caller” option to block this caller.
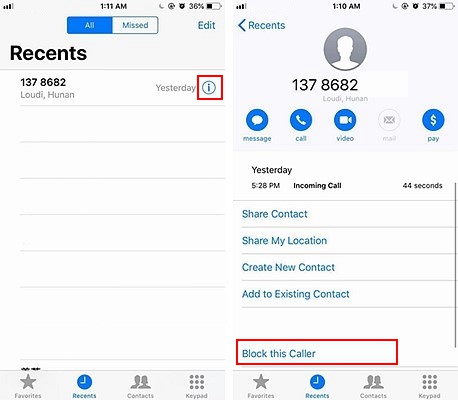
3. If the spammer number did not call you but send you a text message, then you need to block this contact through the messages interface. Launch the Messages app, select the spammer contact, and then tap on the “i” button at the top right corner. Hold the name/phone number of this spammer and then select the “Block this Caller” option. This option is at the bottom of the contact info screen.
If you are yet to try out these 5 best tips and tricks for iMessage on iPhone, then you need to give them a try right away. Not only will these tricks thrill you but they will also help you to find more use of your iOS devices.