ADB and Fastboot mode enable the Android device user to install a custom recovery or custom ROM and root the Android device. Another important function of ADB and Fastboot that is worth mentioning is that you can troubleshoot your bricked or death Android device without having to worry about the sometimes exorbitant repair charges by the repair dealers. Follow this guide to learn how to install and use ADB and Fastboot.

Part 1: What are ADB and Fastboot?
Part 2: How to Install ADB on Computer
Part 3: How to use ADB Command
ADB means Android Debug Bridge.It is a communication tool for your Personal Computer and your Android smartphone or another device. It is composed of two parts: a client and a server.ADB works when the Android Device is running. This allows you to access system folders or enable the hidden settings.
Fastboot is a diagnostic tool. It works when the Andriod is not working( in Bootloader mode). It modifies the Android system from a computer. The commands that you can use here are basic. One of the commands is ‘flash’. Fastboot is often used when you want to install a custom recovery on the Android device.
Both of these utilities are controlled by the Command prompt on Windows or the terminal on Mac and Linux.
Step 1 – Set up device to use ADB
ADB drivers are not needed for Windows 10 and Mac, Linux. But on Windows 7 and earlier, you will need to download and install ADB drivers first.
A driver is a small program. It enables the OS (Operating system) to recognize a device and use it as desired. You can download ADB Driver Installer from adbdriver.com. It is a universal solution to USB Debugging installation. You could also check other Driver options on the Android developer website.
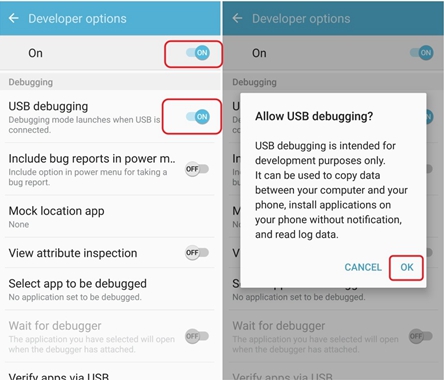
Next set up USB debugging on the Android device to allow it to use the tools.
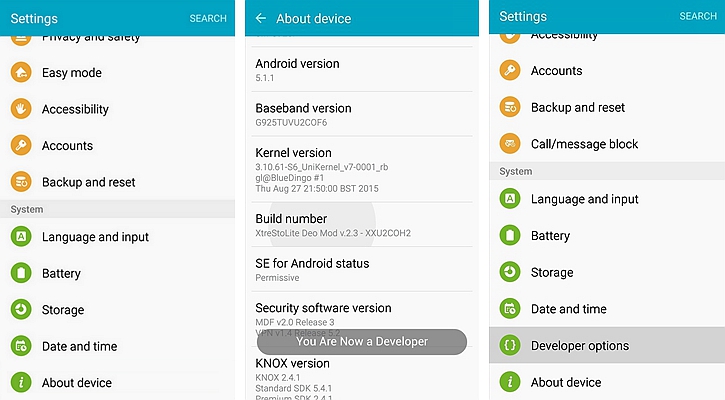
First enabling developer options. Go to settings> About phone then tap on Build number seven times in a succession of each other. Go back to Main settings. You will see a now-visible “Developer option” above the About phone.

Go to Developer option and turn on USB debugging. You are now ready to proceed to the next step.

Step 2 – Install ADB tools (this step is for Windows Only)
Go to Android Developer website and download the developer tool. Once you unzip the developer tool installer App, you will see a folder named Platforms tools and navigate around it to the commands.
Step 3 – Use the ADB on Command Prompt
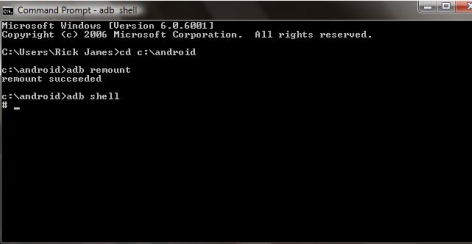
For Windows, open the Command Prompt and enter cd [path to platform-tools].
Or type cd[space] and then drag the developer tool folder into the Command prompt window. This will unravel all the paths available to you.
Or, you could shift and Right-click the platform-tools folder and select Open Command Prompt Here.

For the Mac or Linux, the procedures above apply but you will have to end each command with a dot>slash and the paths will be opened up for you just the same as it would do with the Windows.
There are innumerable ways to use the ADB Command. Below are a few commands worth trying out.
adb reboot recovery: Boots Android device into recovery mode.
adb reboot bootloader: Boot Android device into bootloader. In bootloader mode, you can communicate with your device with Fastboot command.
adb pull [path to file] [path to folder] Copy a file that is stored on your phone and save it to specific folder on your computer.
adb push [path to file] [path to folder] Send a file from your computer to your Android device.
adb install [path to file] Installs an APK app on your phone.
adb uninstall [package name] Uninstalls an app. You will have to enter the name of the package in full — mostly something like com.devname.app name — as opposed to the app name.
fastboot flash recovery [filename.img] Install a recovery mode such as CWM or TWRP.
fastboot -w will completely erase from your phone to prepare for flashing in a custom ROM.
fastboot update [path to rom.zip] It flashes a custom ROM. This is a useful option if you have never rooted your device.