Photo sharing is a booming trend across the mobile platforms nowadays with all the manner of services that have been popping up almost on a regular basis. Here we will discuss some coolest ways to share your photos or videos with your Android phone which will be highly effective tutorial specially for the newbies.
Solution 1: Simply by Using the Option “Share”
Solution 2: Create a Shared Album with Google Photos
Solution 3: Create a Collaborative Album that People Can Add Photos
Solution 4: Share Images Between your Android Devices Using Android Beams
Solution 5: Transfer Images from Android Phone to Other Phones via OTG
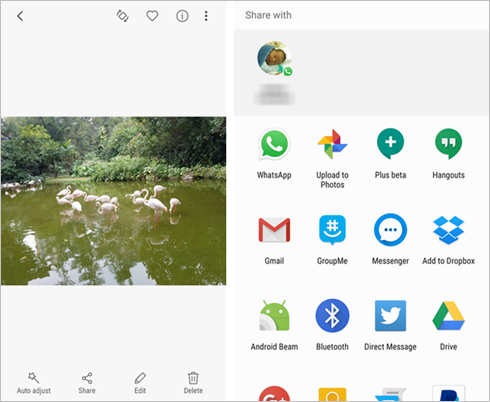
The easiest way to share your images from your Android phone to the world is simply looking for the “Share” icon within the “Gallery” app.
Select an image and then tap the “Share” icon. You will peruse multiple app options which will be shown on the list to prefer a sharing method. Here are some of those choices mentioned below :
Bluetooth: Send the image or video to different devices via Bluetooth connection. Those other devices could be mobile phones and printers as well if you want to print the same.
Gmail or Email: Attach the photo to a newly created message using the “Gmail” or other Email apps.
Facebook: Facebook app also gives you options to share the photo.
Google Drive/Dropbox: Save the image to your Google Drive. If you have “Dropbox” app installed, you will find an “Add to Dropbox” button to save the photo on the cloud storage site.
Swipe to review all these options. The cumulative number of apps available for sharing photos will depend on the variation of apps that have been installed on your smartphone.
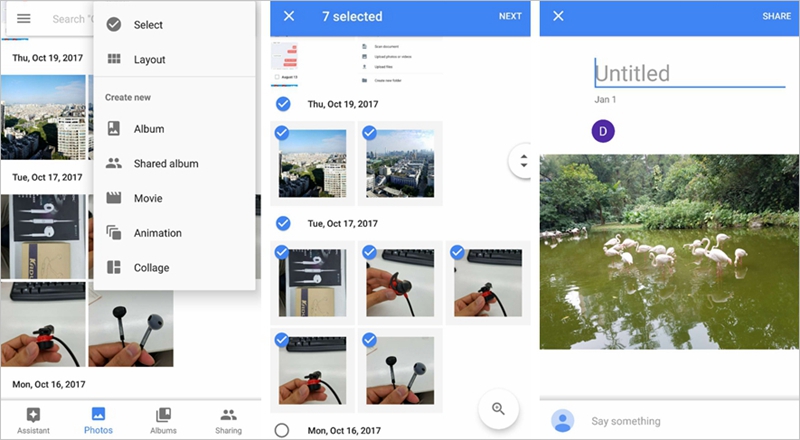
The recently released feature in Google Photos shared album is a fantastic one for the people who would like to manage all of their best memories using Google Photos app. It will allow the user to share a personalized album with other cross-platform users who can easily join and contribute via “Google Photos” app. Shared albums can even be created on your mobile handset or on the website “photos.google.com”. Building your own Shared Google Photos album is easy. In this tutorial, use the following steps to get started.
Step 1: Launch the “Google Photos” app on your smartphone or tablet. Now, on the three vertical dots in the upside right corner, and then tap Shared album.
Step 2: Select the images for your album, just tick as many photos as you wish. You can opt out a photo from the selected items just by tapping on it. Now, tap “Next” when you complete your selection of pictures.
Step 3: Next, enter the album name to create the shared album.
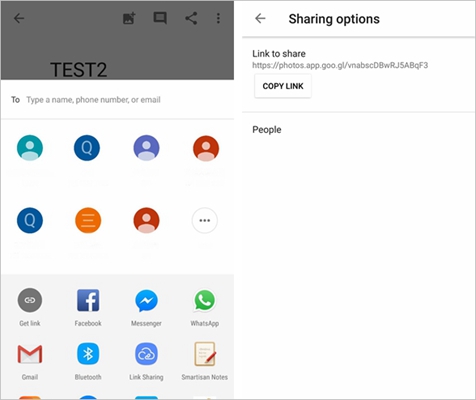
Step 4: Tap on “share” to share the link of your album via apps or select “Get Link” to copy the created link to your handset’s clipboard.
You can share or paste the link with WhatsApp, facebook or email, text message, or any other type of sharing media to send the album link to the person with whom you wish to share your photo album.
Step 5: After receiving the link, the recipient will get the option to open the link in any web browser or in the “Google Photos” app if it is installed earlier. After opening the link, the person will be prompted to join the shared album.
When he/she does this, the profile picture will then appear next to your profile picture at the top of the shared album under the name. Next time onwards, whoever will join the album, can contribute to this album and also edit it.
Step 6: The Shared albums will not be stored with your other albums. To access the shared albums, tap the three horizontal bars in the upper right corner in the menu bar and select the Shared Albums. All the photos that you have shared from your Google Photos will show up here.
Step 1: First follow solution 3 to create a shared album.
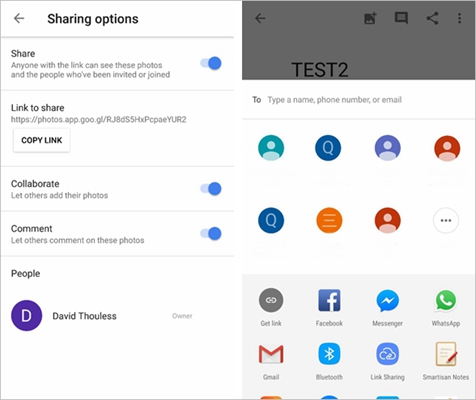
Step 2: Once create the album, tap menu icon and turn on “Collaborate” option to allow multiple persons add, edit or remove images in the album.
Step 3: Click the option “SHARE” at the top right corner and use the link to share the album.
Step 1: Click the “Google Photos” app or open “photos.google.com” in a web browser.
Step 2: On the top left side, tap on Menu > Shared albums.
Step 3: Now, open the album you want to take a tour. At the top of the screen, you might see the Profile pictures of persons who have joined. To get details of any of them, tap their profile picture. If you are seeing only your profile picture, that means no one has yet joined the album.
N.B. people having the shared album link can still see your album, even if they haven’t joined your album. You cannot remove any individual from the album, but in place of that you can stop others from seeing your album like below :
Step 1: Open the shared album you want to update.
Step 2: At the upper right corner, tap mune icon, choose the “Sharing” option.
Step 3: Turn the switch off next to the button “Collaborate”.
People can still watch the album if they have the shared album link unless you have turned off the option “Share album.”
Android Beam is an NFC based sharing module which allows the sharing of photos, contacts, web links, locations, and other data by tapping two NFC equipped Android devices back to back. In this feature, any Android device running version 4.1 or above with NFC chip within it can transfer images via NFC using the Android Beam.
Following steps elaborate the same :
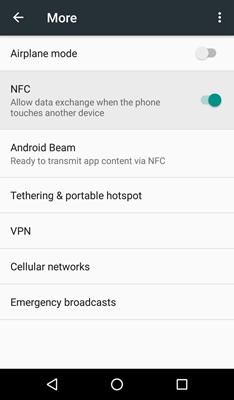
Step 1. Tap the “Settings” app on your device.
Then, under the section “Wireless & networks,” click “More”.
Now, tap the NFC switch to make it activate. Thus, the Android Beam function will be also automatically turned on.
N.B. Both the sending and receiving devices should have NFC and Android Beam activated. Also, Neither of the devices should be locked.
Step 2. Put both the devices’ backsides against each other. After that, open “Gallery” app and choose the images you want to send.
Step 3. Now, wait for the sound and haptic confirmation which both the phones have detected each other.
Step 4. You will notice the sender device’s screen will shrink into a thumbnail and also display “Touch to beam” option at the top. Afterwards, click the sender’s screen to start beaming.
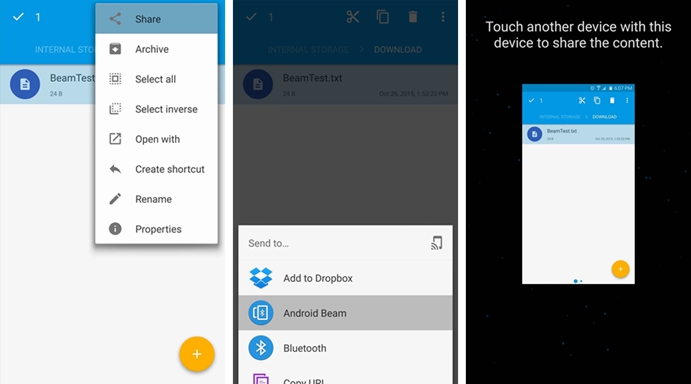
Step 5. After beaming completes, you will hear an audio confirmation. At this time, the target phone will display the received content in its notification panel.
If you want to connect two phones in unison, OTG, i.e. On-the-Go is an utmost way. OTG cables enable your Android phone to connect with other smartphones without using a PC. Likewise, in lieu of connecting the Android phone to computer to transfer images and then copy those images to another smartphone, the USB OTG will allow you to share the images between two Android devices directly.
Get the details below, how it works :
Step 1. Frist, Connect both the Android devices to the OTG. Remember, don’t forget to enable the USB debugging on your phones.
Step 2. Tap “Gallery” on the target phone. You will get a pop-up showing “Allow the app Gallery to access the USB device”. Now, click the “OK” button.
Step 3. When in the target phone, you are in Gallery, select the images you want and long press on them. Then click the “IMPORT” button at the upside right corner. The transfer will be started. When it completes the transfer, all the selected items will be imported from the source Android phone and shown on the target Device.