Have you ever chatted with a person over a messaging app and then it reached a time you wanted to share a file with them. The next option was likely a request for their email address so that you can send such a file. This implies that you will have to move from the messaging platform, open your email app, send the message, and then go back to the messaging app to alert the person on the other end that you have already sent the file. You will agree with me that this is cumbersome and inconvenient.
If you use Facebook Messenger to chat with friends and co-workers, you need not experience such setbacks when sending files. The Facebook developers, in early 2016 foresaw these challenges and developed features within the Facebook messenger to enable you to seamlessly share all Dropbox files on the Facebook Messenger as normal messages. The benefit of such a file-sharing platform is that you will not only be able to send the files but also you will be able to track whether they have been delivered. Thus there will be no need to send extra messages enquiring whether the other party got the file or not. This is unlike the email system of sharing files where you will have to wait for the recipient to send a confirmation of receipt of the sent files.
This article will guide you through a detailed step by step method on how to transfer files in Facebook messenger. You will also get insights on how you can accomplish this using your PC.
How to Transfer Files from Dropbox to Facebook Messenger on your Android and iPhone
How to Transfer Files in Facebook Messenger on PC
How to Transfer Files on Messenger.com using a PC
For you to be able to transfer files from Dropbox to Facebook messenger you will need to first install both the Dropbox app and the Facebook messenger.
The steps
Step 1. In Facebook messenger, browse through your contacts and select the contact you would like to share your Dropbox files with.
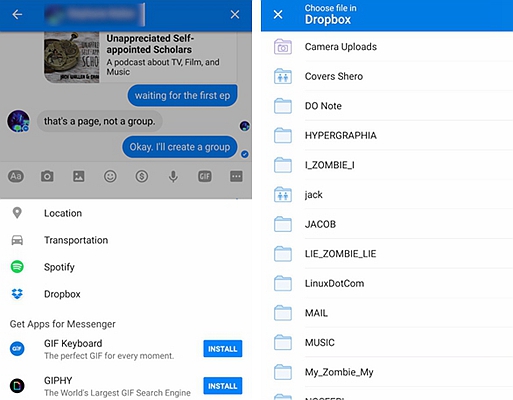
Step 2. On the far right of this conversation interface, you will notice three dots. Tap this menu icon and a pop up will be displayed on the screen.
Step 3. Depending on the number of Facebook Messenger compatible apps installed on your app, the list of the menu options displayed may vary. However, since you will have installed Dropbox, this menu item will appear as one of the installed apps.
Step 4. Select the Dropbox option. The Dropbox app will launch and display its window above the Facebook Messenger window.
Step 5. Browse through the files you have on Dropbox and tap the files you would like to share on Facebook Messenger.
Tapping ‘send’ will share these files with your Facebook Messenger contact selected earlier.

It is good to note that depending on the file type some files such as .png and .jpeg (image files) will be displayed on the messenger window as they are while others such as pdf and word documents will appear as links which when tapped downloads the original file.
If you are using a PC and you would like to share files from your PC to a contact on Facebook, the procedure used is quite easy.
The steps
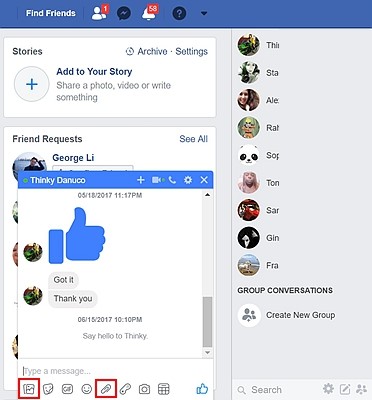
Step 1. On the Facebook’s menu bar at the top, select the messages icon. This icon has a lightning illustration and comes after the ‘Friend Requests’ icon. You should, therefore, have no difficulties locating it.
Step 2. A drop-down menu will appear. This menu will not contain all your past messages but just the recent messages. If the contact you would like to share the file with is not among the recent contacts displayed on this drop-down menu, select ‘See All in Messenger’ to get a full window interface of all the communication threads.
Step 3. On the left side of this messenger window, you will see all the contacts who you are connected with on messenger. You can hover the cursor on the right side of this left contacts segment to get a scrollbar. Use this scroll bar to scroll down the list of contacts. You can as well search a specific contact using the Search feature at the top of this left contacts segment.
Step 4. After selecting the contact which you would like to share the file with, check at the bottom of this interface. Several icons will be displayed. To check the function of each of these icons, hover the cursor over the icon. The first icon on this interface will enable you to send files, while the other icons have options for stickers, GIFs, emoji, and games. Since your main aim is to send files, select the ‘Send file’ icon.
Step 5. After clicking the ‘Send file’ your PC will launch a desktop interface for you to browse the files you would like to share. You can select several files all at once or send one file at a time. After selecting the files you would like to share click “Open’ to upload these files to the Facebook Messenger interface. Clicking “Send” will initiate the file sharing process. Once the files are delivered you will see a blue tick below the sent files interface.
Step 6. The recipient will be able to view image files right on their messenger platform. For non-image files such as PDFs and word documents, the user will need to download these files and view them using a suitable application installed on their PCs.

Step 1. Open your favorite browser on your PC and type messenger.com.
Step 2. After messenger.com website loads, you will be prompted to enter your Facebook login credentials. But instead of being directed to the Facebook usual website you will be directed to a messaging interface.
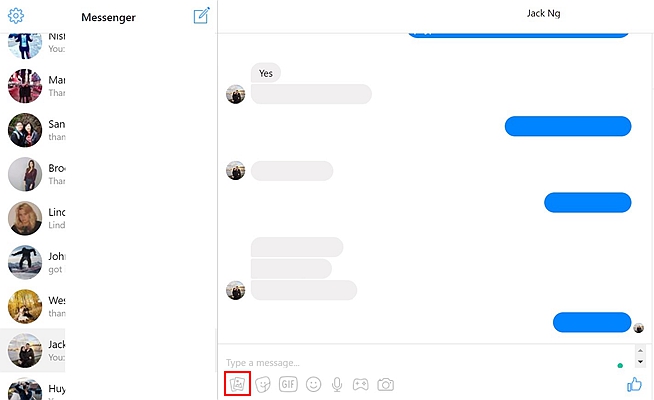
Step 3. The interface will be similar to the one which you get when you select ‘See all in Messenger’ under the Facebook.com interface.
Step 4. The procedure of sending files on messenger.com is the same as that of Facebook.com. You will thus select a given contact, click on ‘Add Files’ icon, and select the files which you would like to share. Clicking ‘Send’ on the messenger interface will send the selected file(s).

If you have been facing difficulties trying to crack out a way on how to transfer files in Facebook messenger then your challenges have been solved. It is up to you to choose whether you would like to use your smartphone to transfer the files or use the available PC options to accomplish this task.