“Hi, my One plus 7/7pro/7 phone stated glitching last week, and I decided to factory reset it. The glitching problem was solved, but my problems had just gotten even worse- it deleted all my photos and videos. What can I do”?
Even though your OnePlus 7T is mind-blowing, you can still find yourself in situations just like the one above. Data loss is common in many smartphones and this one is not exceptional. There are many reasons that may lead to loss of your Videos and photos and some of them are listed below!
· Accidental or mistaken deletion
· System crush
· Damaged caused by water entry
· Broken phone or screen
· Factory resetting without backup.
So, is it possible to recover deleted videos or photos from OnePlus 7/7 Pro/ 7T? Yes! it is possible and this guide will address how you can accomplish it.
Join me!
Recover deleted photos and videos from OnePlus without backup
How to back up photos and videos to the cloud
If you have deleted your precious videos or photos by accident or maybe because of other cause and you don’t have a backup, then don’t worry! All you need is a wonderful Android Data Recovery toolkit.
Android Data Recovery toolkit allows you to select, preview and recover the deleted photos and videos. Also, it allows recovery of other data types such as contacts, text message, call logs, music and other documents from your OnePlus easily and with ease.
Advantages of using Android Data Recovery toolkit
1. The software supports a wide range of Android devices ranging from OnePlus (like OnePlus 7/7 Pro/7T and previous OnePlus 6/6T/5/5T) to Samsung Galaxy to Moto, LG and many more.
2. The software recovers data from accidentally deleted crashed, screen-lock, virus attacked phones, and factory resetting.
3. Permits preview and Selectivity of data before the recovery process begins.
Here are the steps for recovering deleted photos and videos from OnePlus using Android Data Recovery toolkit
Downloading and Installing the toolkit
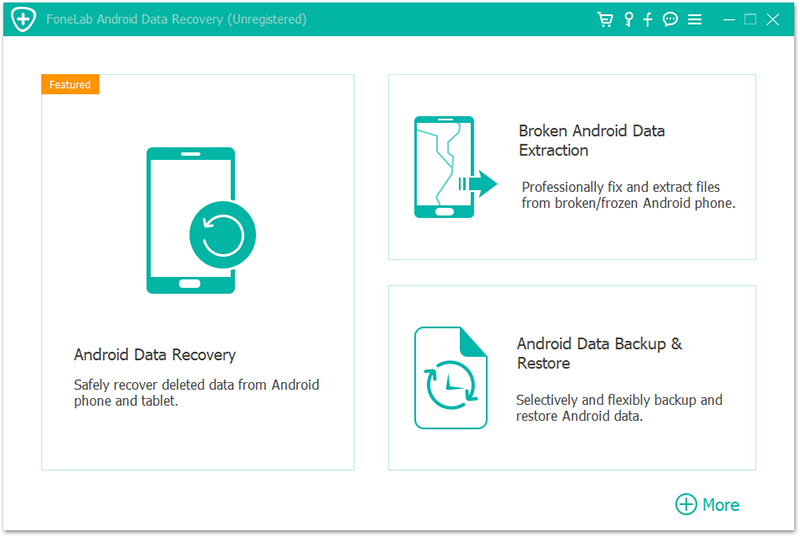
Download and install the Android Data Recovery toolkit. If the launch doesn’t begin automatically after installation, then double-click to launch.
Connect Your Phone to your computer
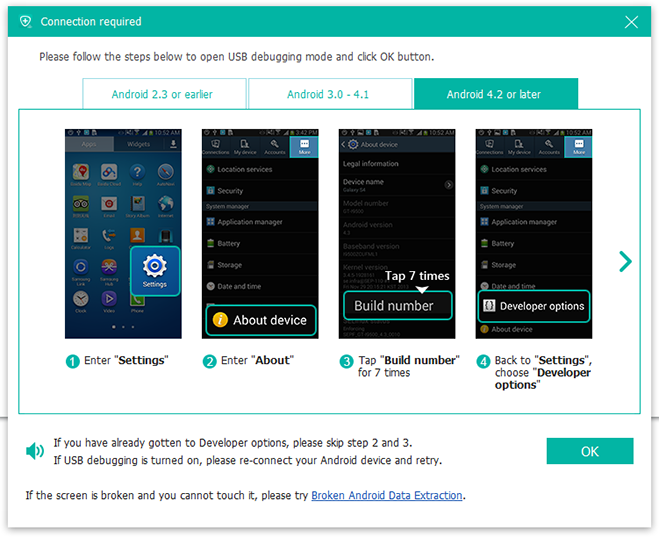
Connect your phone to your computer via a USB cable and enable USB debugging. Select the MTP mode for an easy discovery of your phone.
Select the data type
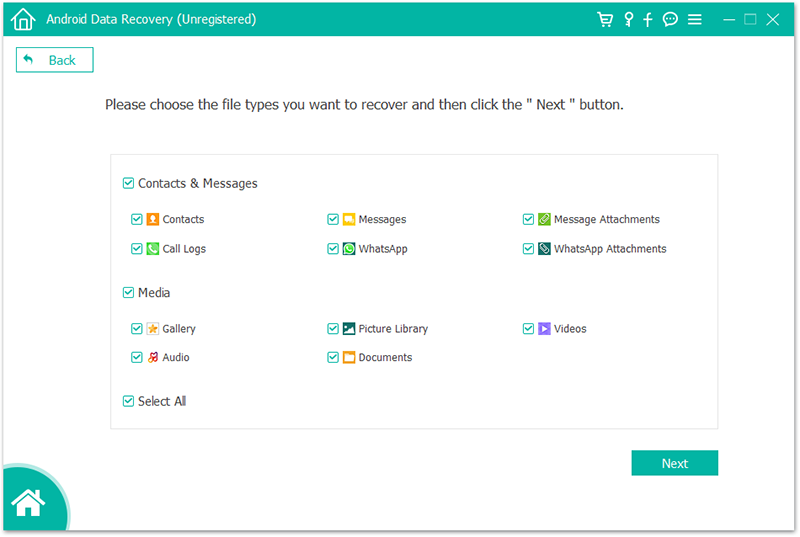
In this step, you need to select the data you wish to scan. For you to Scan for deleted photos and videos, check the Gallery and Video checkboxes.
When you are prompt to permit more privilege for the toolkit so it can scan your lost files, click Grant/ Allow on your phone screen. The scanning process might take some time, be patient.
Select the items you desire to recover
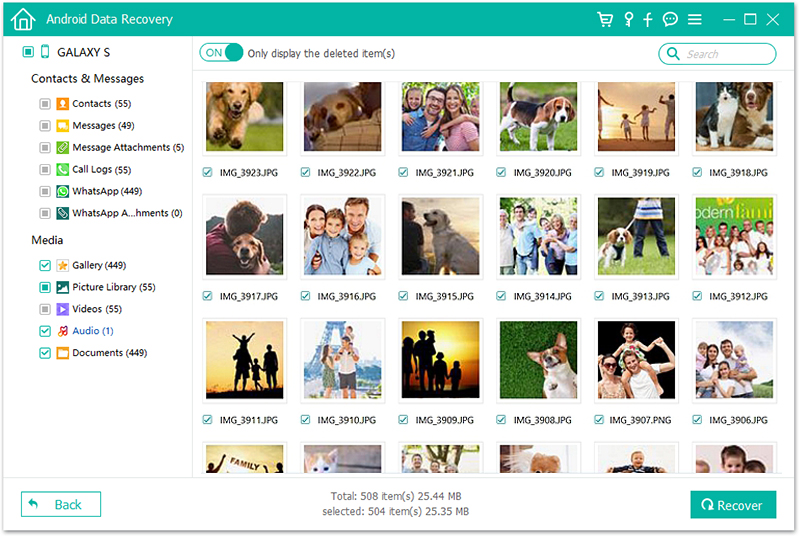
For photos and videos, select Gallery and videos respectively on the left side of the window. Preview the files and determine which photos and videos do you wish to recover by ticking the box and each item. Click Recover to start the recovery process.
The toolkit will save your photos and videos automatically on your computer. As a result, you will have access to them every time and you can transfer the items to where you want.
Is your phone storage full? Do you have all these cool photos and videos and you don’t know where to store them? Don’t worry! Have you ever tried backing them up to the cloud? There are many cloud storage software’s out there but our focus today will be on Google Photos, Google Drive and Dropbox.
Let’s learn how we can use them to back up all those awesome photos and videos.
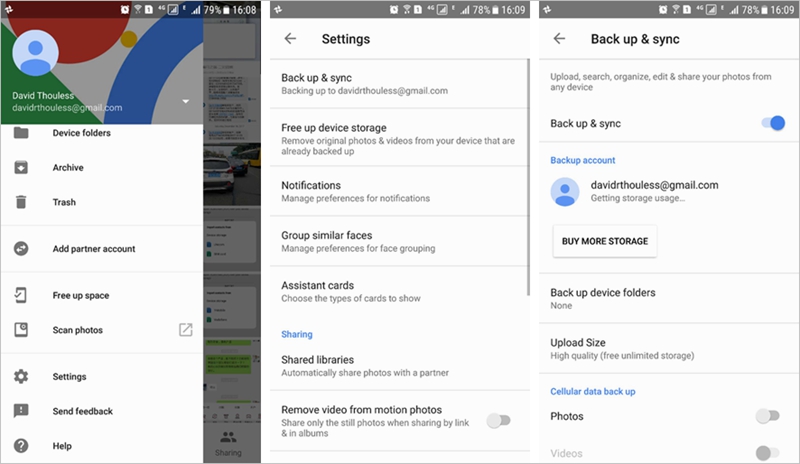
Google Photos is one of the most famous and most used cloud storage software. It comes pre-installed on most Android Smartphones and its perfect for storing and backing up photos and videos.
1. If your smartphone lacks it, download it for free from Google Play Store.
2. Once downloaded, launch it and allow it to access your photo and video library.
3. Next click “Backup and Sync” and all your photos and videos will be automatically copied to the cloud where you can access them with ease and from anywhere.
1. Install Google Drive on your phone.
2. From the app drawer on your phone, launch your Gallery application.
Select the photo or photos you wish to upload to Google Drive.
Click the share button at the top of the screen, marked with a right-facing “V” with dots at each point.
Click “Save to Drive”.
Or open Google Drive and tap “+” and choose “Upload” to add photos and videos.
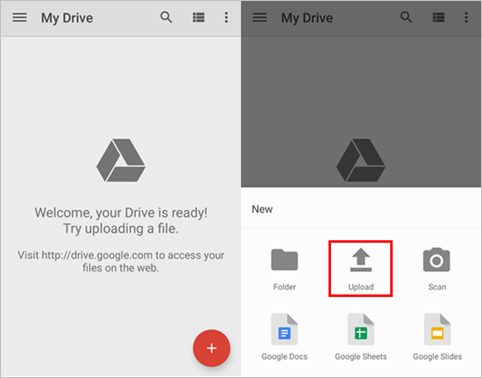
4. To select the folder, you want to files in Google Drive, tap “Folder”.
Click “Select Folder” in the bottom corner of your screen.
Tap “Save”.
Free to download, free 2GB online storage and user-friendly interface are some few perks associated with owning a Dropbox software. All you need to do to get this wonderful deal is to sign up for and create an account with Dropbox. Once you have done that you are set to back up your photos and videos to the cloud from any device with a web browser.
Here is how you can use Dropbox to back up Photos and Videos
1. Run the Dropbox on your phone.
2. After signing in, tap the “Add button”.
3. Click “Upload photos or videos”.
4. Select the photos and videos you want to be uploaded to Dropbox.
5. Finally, click “Upload” and your Dropbox will back up your files.
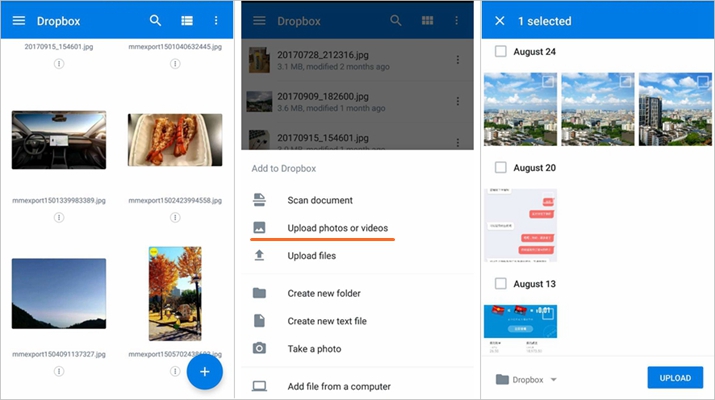
Now, you can access your backed-up photos and videos from anywhere and from any device as long as there is an active internet connection.