The Files app is a file management application that comes with the iOS 11 and updated in iOS 12. As its name suggests, it deals with finding, sharing, and organizing files; so basically managing files. It is the native app that comes with iPhone X/XS/XS Max/XR and older devices that runs on iOS 12.

What is new with Files App?
What it looks like
Adding third-party apps
Finding your files
Managing your files
Drag and drop
Sharing Files
Collaborating with other people
Files stored locally in the device
First, it is a direct replacement of the iCloud Drive app. This means that the iCloud Drive app will no longer be a feature of the iOS devices from the iOS 11 moving forward.
While the app it replaces only had iCloud Drive services, it now allows users to access other cloud services like Google Drive and Dropbox. It also allows you to manage locally stored files. In summary, this app allows you to access all your files on the go no matter where they are stored.
The iPad and the iPhone interfaces are different. With the iPad, the Browse tab on the left of the screen and the files are on the right (in grid view or list view). However, since the iPhone screen is smaller, the Browse tab is in its own window and a new window comes up when you open a location that shows the constituent files and folders of that particular storage location.
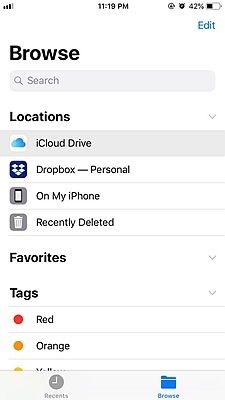
When you open the app on your iPhone, the first window is the Browse window. In this window, we have three items:

Locations: It lists the various locations in which your files are stored. They include the device itself and cloud services like Google Drive, OneDrive, iCloud Drive, Dropbox and any other that have been added to the app. Recently deleted items are stored here to allow you to retrieve files you may have accidentally deleted.
Favorite: The items found here depending on preference. On an iPad, you can add folders or files to this section by dragging and dropping. On an iPhone, press, hold, and release the file or folder icon. From the menu that pops up, select the Favorite option.
Tags: The items here are customized by the user. They designate labels to the files and folders for easier identification and action taking. Tags on iCloud Drives files are synced with other devices in the Apple ecosystem.
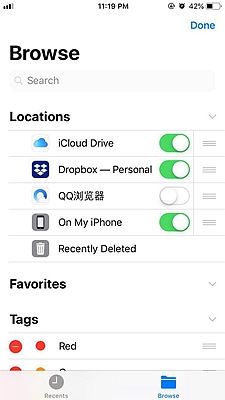
All the third-party apps (basically cloud service provider apps) are listed under the location section in the Browse tab. All files in iCloud Drive automatically show up in the Files App. For the other cloud services, you have to set things up by following these steps:
1. Download the third-party app from the store.
2. Open it and sign in
3. Go to the Files App. Select Edit in the Browse column or window.
4. Under Locations, turn on the app you want to add.

The Files app helps to locate files and folders in different locations. In this regard, it is analogous to Finder on the mac. All you have to do is tap on the Search Bar on the top of the screen and key in the file’s name. To make the whole process easier, you can search for the file under other criteria like Date, Size, or Tags. Select your preferred search mode from these options.
Speaking of managing your files, there are a couple of things you can do with the Files App. You can share, find, edit, view, and organize all your files.
The easiest way to manipulate a single file or folder is to access its submenu. You can do that by tapping and holding its icon. A few options will pop up that will allow you to do a couple of things. These actions are:
When you need to manipulate a single file or multiple files, use the select option. Simply tap on the Select link on the top right corner of the screen. Then select one or multiple files that you intend to work with. At the bottom, there are four actions you can choose from:
Share
Duplicate
Move
Delete
The drag and drop feature allows you to move your files around with ease. All you have to do is tap the file icon, hold, and drag it to the new folder. On an iPad, you can add files and folders to Favorites and Tags by dragging them and dropping them there.
On an iPhone running on iOS 11, you can still drag and drop items but you’ll need to use two fingers to move things to a location that requires you to open a new window. Simply tap and hold the file with one finger and use the other finger to navigate to a different window.
Files app enables you to share files easily. There are different ways to do that. You can share single files or multiple files easily in the following ways:
As for single files, preview the file you intend to share. On the top right, there is a share icon that you can use. Alternatively, tap and hold the file and select the share option from the submenu that pops up.
To share one or multiple files, tap Select on the top right corner of the screen, pick the file(s) and choose the Share option at the bottom right corner.
When you share files, you can decide who has access to the files and what they can do to them. To do that, select Share Options at the bottom of the Share wizard pop up. Here, you can set who can access the file and who has permission to make changes to a file. When you allow another user to make changes to the file, these changes are binding and automatically apply to your instance of the file.
The files stored in your device’s memory come under On My iPhone or On My iPad on the Locations tab. You can access these files when you are offline. This comes in handy if you want to work on something but can’t use the internet (on a plane for instance).
Directly accessing the locally stored files on the Files app is impossible from the start. However, you can work around this by downloading an app like pages from the Office Suite. From the app, you can then access files and create sub-folders to manage your local files.
To store online files locally, locate the file that you want to download, tap and hold its icon and use the Move option to move it to On My iPhone or On my iPad.
Now you can use the Files app on iPhone and iPad to manage and share your docs. The files you can work with can be on your iCloud Drive account or on other cloud services. Once you share your files, other people can edit them if you allow them. This app has been a long time coming and it’s only going to get better.