With its increasing number of applications and functions, smartphones have inevitably become extensions of ourselves. Into these devices, we store data pertaining to our professional and personal. These pieces of information could range from our text messages, WhatsApp chat, photos, work Email to important details such as payment information.
Because they contain these sensitive pieces of information, it is very important that we protect them. Thankfully, Apple takes it very seriously to make iPhones more secure. More and more updates of identification and lock screen such as fingerprint and face ID make it harder to access. However, it’s not all good news. Because security measures are becoming stronger, attempts to disable or bypass them are also becoming smarter. How can you make your iPhone safer? How can you protect your data? How can do you it more quickly? Here are the 6 tips and tricks for iPhone lock screen security.
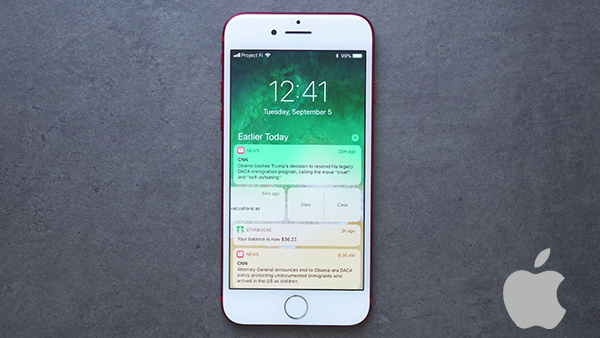
How to Disable Siri and Control Center on the Lock Screen
How to Set Auto-Lock Time
How to Turn Off Notifications on Lock Screen
How to Turn Off Today View on Lock Screen
How to Make Your iPhone Lock Sooner
How to Enable Data Erase after 10 Failed Passcode Attempts
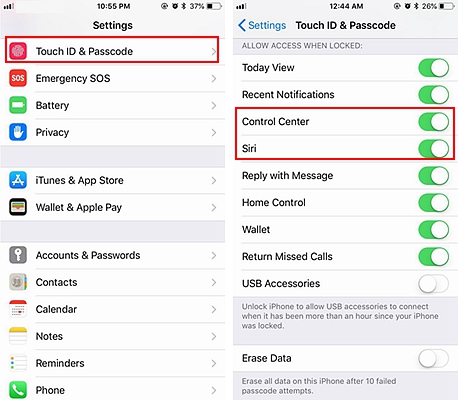
iPhone’s passcode security ensures that our devices will not be opened that easily by other people. However, it is not a guaranteed 100% protection because Siri can still be accessed by anyone who holds your phone. There are still a lot of information that can be obtained through the virtual assistant even when the phone is locked.
Another thing that other people can do to your phone while it is protected by a passcode is turn on the Airplane Mode. What does this mean for you? This means that you can’t trace it using Find my iPphone, another of Apple’s security measures that allow us to track our devices as long as it is connected to the internet. If Airplane Mode is enabled, all the cellular and internet connections of the phone will be disabled. This is why it is best to disable both Siri and Control Center from your lock screen.
To do this, follow the simple steps:
Step 1. On the menu, select “Settings”
Step 2. Look for “Touch ID & Passcode” and select it.
Step 3. Enter your Passcode
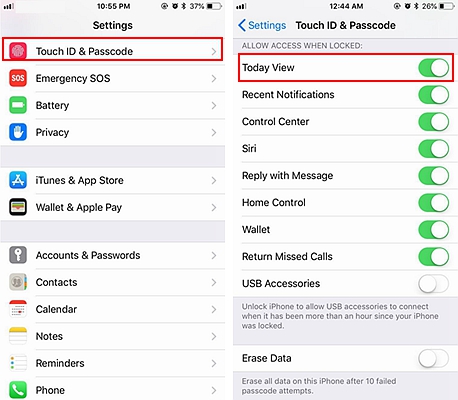
Step 4. Under “ALLOW ACCESS WHEN LOCKED”, you will see a list of functions. Untoggle “Control Center” and “Siri”.
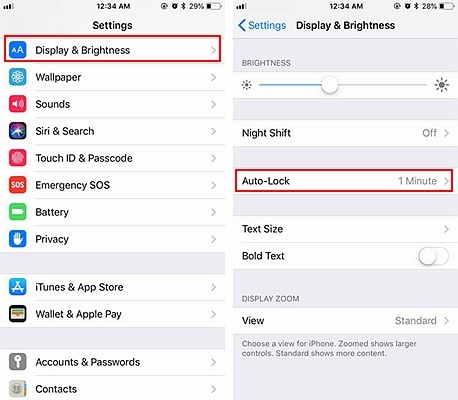
Your iPhone has a side button that enables you to turn it off when not in use. However, you can also set it to automatically lock after up to 5 minutes. This will greatly save energy but more importantly, this will protect your phone when you accidentally leave it somewhere.
To do this, follow these steps:
Step 1. Click “Settings”
Step 2. Look for “Display & Brightness” and select it. It should be on the fourth panel.
Step 3. Select “Auto-Lock”
Step 4. You have 6 options, ranging from “Never” to “30 seconds”. Select what works best for you.
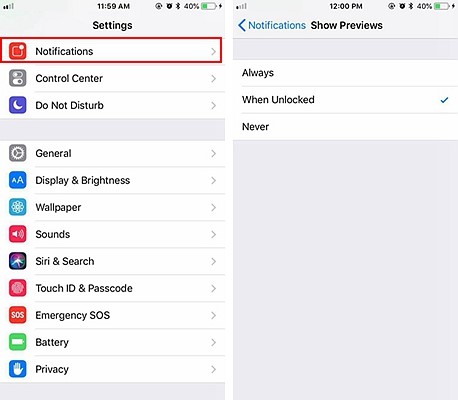
The notification panel is very useful especially for people who are incredibly busy. They don’t have to open the applications to view messages or other information. However, this feature can be a disadvantage when you lost your phone. The notifications will still provide confidential information, ranging from text or chat messages to the identity of your contacts. You can turn off the notifications of the apps that you think has the potential of giving those details.
To do this:
Step 1. On the menu, select “Settings”
Step 2. Look for “Notifications”, which you should find on the third panel
Step 3. Select the app you need. On the third panel, you can see “Show on Lock Screen”. Untoggle it.
Today View is another iPhone feature that makes it easier for you to access information such as calendar events, weather, Siri suggestions, and so many other. Sadly, this also makes it easier for other people to see important information on the lock screen. You have the option to turn it off.
To do this,
Step 1. On the menu, select “Settings”
Step 2. Look for “Touch ID & Passcode” and select it.
Step 3. Enter your passcode
Step 4. Look for “Today View” under “ALLOW ACCESS WHEN LOCKED”. Untoggle it.
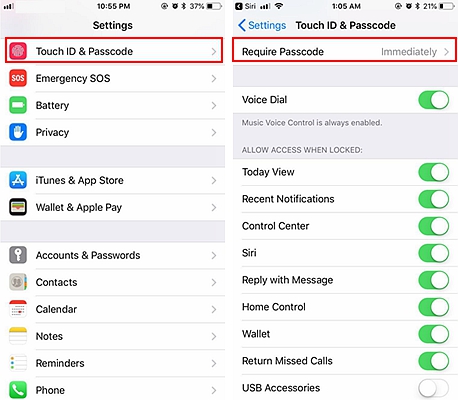
The automatic lock function of the iPhone is very convenient. If we left it unattended long enough, it will require you to open it again with the passcode. Some people set it to lock longer so they can avoid entering their passcode or unlocking the phone with their fingerprints very often. The longest you can set it is 4 hours. This could work when you are at home. It is indeed tiring to keep on punching in the code when you are just lying on your bed while browsing the internet. However, the real threat comes when we leave it not in a familiar place, but in public areas such as the bus, train, restaurants, etc. As there are a lot of people in these places, it is easy for others to find your phone right away. If your automatic iPhone lock takes a few minutes to require your passcode, there is a high chance that others will be able to access it. What you can do is set your Require Passcode function to “Immediately”.
To do this, follow these steps:
Step 1. Go to Settings and Look for “Touch ID & Passcode”.
Step 2. Enter your passcode
Step 3. You can see there “Require Passcode”, click it and change it to “Immediately”
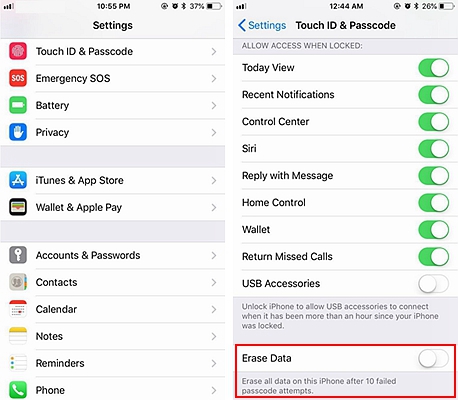
Our passcodes only contain 4 or 6 digits, depending on which you selected. Although the 6-digit passcode is more secure, it is more common for people to choose the former because it is less hassle to type in. Following the rules of statistics, thieves will only have to try enough times to figure it out. When that happens, they basically gain access to everything you have on your phone. This is why you have the option to have your iPhone delete all the data after 10 incorrect attempts.
A lot of iPhone users are reluctant to use this feature because of their fear of erasing everything by mistake. To prevent this from happening, your iPhone will actually be disabled for a certain amount of time after 4 incorrect passcodes. The time will be longer as you incur more consecutive mistakes. This prevents any accidental wipe out.
To do this, follow these steps:
Step 1. On the Settings menu, move to “Touch ID & Passcode”.
Step 2. Enter your passcode
Step 4. Scroll down until you reach the last option which is “Erase Data”. Toggle this to enable the function.
Although it is Apple’s responsibility to make sure that the devices they produced have high end security measures, you also have a part to play. Protect your phone and data with these simple steps now.