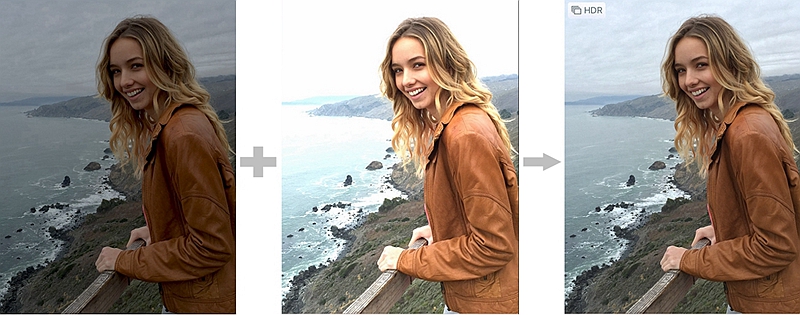
If you have used the iPhone camera, this question must have popped up in your mind at one point or another: Why does the iPhone take 2 pictures when the HDR option is selected?
A simple answer to this question:
Your iPhone takes two photos when HDR option is selected to give you a choice of comparing the HDR photo with the normal photo and pick the one which best appeals to you.
But if you are looking for a more in-depth answer, then you need to read up to the end. You will also find out how you can stop your camera from taking two photos and thus saving you more storage space.
What is HDR Mode and How Does it Work?
How to Stop iPhone Camera HDR Saving Two Pictures
For instance, if a photo is being taken in a brightly colored background, adjusting the brightness of the camera will result in two things. Increasing the brightness level of the camera will capture the subject with an unusually high glare. Lowering the brightness level will create a dark environment which will look unnatural and thus not quite appealing to the eyes.
So you will either end up with a photo which is underexposed or overexposed. But you need a high-quality photo, a photo which you will be proud to share with your friends and connections!
So what’s the solution
The solution is to switch your camera to HDR (High Dynamic Range) mode. This dynamic mode will capture different photos under different brightness levels and merge the photos to create a balanced image. When the HDR mode is enabled on your iPhone camera, the camera will store both the normal image and the HDR image. The HDR image is bigger in size than the normal photos since it’s formed from merging different images into one. But it’s also clearer, more detailed, and balanced.

Storing both the normal and the HDR image is quite useful since you will have time to compare and pick the better photo and discard the other low-quality photo. But sometimes this may be hectic.
If you fail to manage the photos over time, you may end up exhausting your storage space since the HDR photo takes quite a big space. However, there is a way out. You can choose to keep the HDR photo only and automatically discard the normal photo. Move to the next part of this article to learn how you can achieve this.
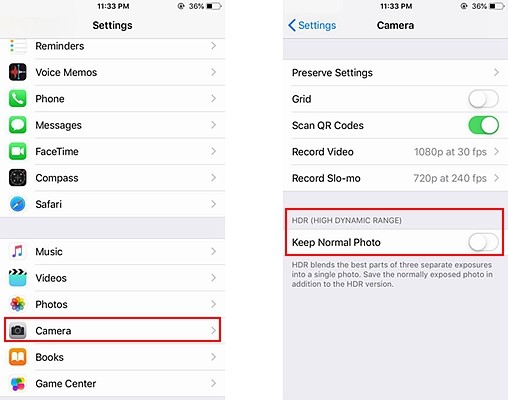
With iPhone, it’s possible to set your camera to keep HDR photo and automatically discard the normal photo. To set this, follow the steps below:
1. Launch the Settings app from the App tray.
2. Tap the “Camera” option to access the Camera settings interface.
3. Look for the “Keep normal photo” option and toggle the switch button from ON to OFF.
4. Close the settings app and test the effectiveness of this setting by taking a photo. You will only get the HDR photo while the normal photo will be automatically discarded.

You can always access the photos which you have taken by navigating to the Photo app.
Note:
There are other options under the Camera settings. One of these is the HDR auto mode. If you activate this mode, the camera will automatically switch between normal and HDR mode depending on the subject clarity and the brightness level surrounding the camera lens field. The other option which you might need to use is the HDR mode. Once enabled all photos taken will be exclusively HDR images.
HDR images once captured properly make the best photos. They are not just clear but are also quite balanced ensuring that the background seamlessly matches with the subject being captured by the camera. If you want to enjoy the HDR capabilities of your iOS camera and still ensure that your storage space is not quickly exhausted, then turn on the HDR mode and disable the “Keep normal photo” option.